
So, here's my tutorial on how to make your own monogrammed/personalized phone case for an iPhone 4/4s, or 3/gs. It can also work for other phones, Blackberries, iPod touches, and iPads, but the sizes for those will be different. Find them here!
{I'll be using a graphics program called GIMP (you can download it for free at gimp.org), but you can use Photoshop or any program like that! Paint can work too, but you can't make layers.}
Step 1: Open up GIMP, Photoshop, or whichever program you want to use.
Step 2: Make a new image that is 751 pixels wide and 1414 pixels long.
Step 3: Now it's time to make the stripes. Select the rectangle tool, change the color you are using from black to red, and just make rectangles across the whole image. Make sure they're the same size, and also spaced the same.

Step 4: Now it's time to make the space for the monogram or the name. Make a new layer (go up to layer, then select new layer). Choose the circle tool, make a circle in the middle of the background, then fill it in with blue.

Step 5: Make another new layer. Change the color you are using to white, then make a smaller circle inside the blue circle. Fill it in with white.
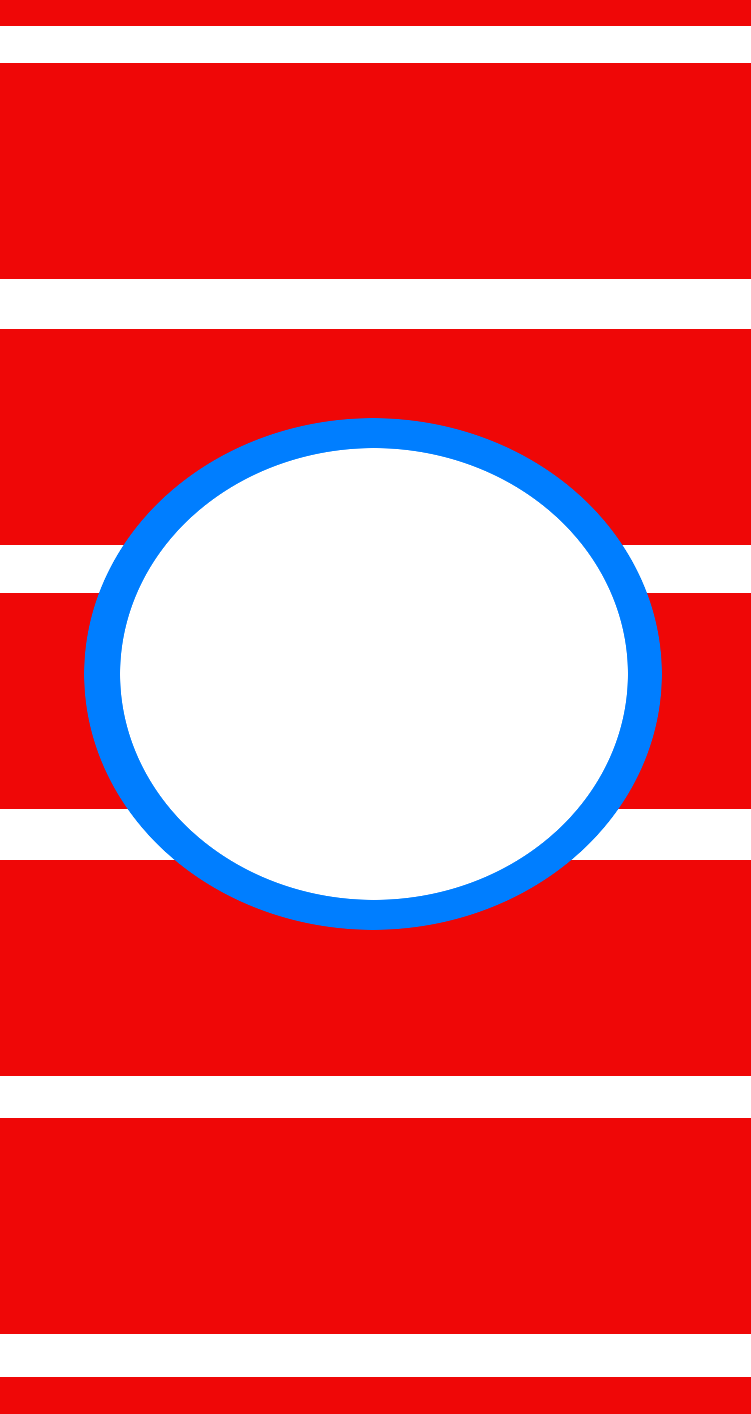
Step 6: Make another new layer, make a smaller circle inside the white circle, and fill it in with the same blue you used before.

Step 7: It's time to add your name or your monogram! Change the color you're using to white, then select the text tool and pick any font. For your monogram, first type the letter of your middle inital and put it in the center of the circle. Then type the letter of your first initial, make it smaller than the middle one, and put it on the left side. Type the letter of your last initial, make it the same size as your first initial, and put it on the right side of the middle initial.

Step 8: Save your image as a PNG file (just name it phonecase.png), and then click here if you're making an iPhone 4 case, and here if you're making another type of case. Scroll down to electronics, and choose the one you want!
Step 9: Once you've clicked the Zazzle link, look under Customize It! then click Add Images, click Select Images to Upload, then find your phone case image and upload.
Step 10: You might want to zoom out just once to make the monogram fit better, so click the magnifying glass with the minus sign on it once.
Step 11: VOILA! Your case is complete! Once you're satisfied, click Add to Cart then if you have a Zazzle sign in, and if not make an account then check out. The case overall is $34.95, which really isn't that bad! And it's all yours, what could be better than that?! Here's mine!

I really hope you all find this tutorial useful! Making the case is so much fun because you get to be really creative and do your own thing! Please share the cases you make, I'd love to see them!
14 comments:
Thanks Clara!
Oh wow! This was really cool!
XO,
SWEATshirt DRESSshirt
http://sweatshirtdressshirt.blogspot.com
P.S. If you haven't already, you should check out my Juicy Couture heart studs giveaway!
This is such a brilliant idea! So glad to have found your blog! I'm now following :)
fashiontruffles.blogspot.com
you are so crafty. and you're just a sweetheart :)
this is such a good idea! some of the monogrammed phone cases are super expensive! this is such a lovely alternative :)
xoxo,
tiana of l'esthetique
Thank you all! :
Lovely post!
Xoxo from Rio de Janeiro,
Isabella
www.reviravoltta.com
Great tutorial! I love anything involving a monogram.
KK
great tutorial!! unfortunately i dont have an iphone other wise id totally make one right now. lol
This is such a great tutorial!
Much love from the SABO SKIRT girls!
SHOP: www.saboskirt.com
BLOG: www.saboskirt.blogspot.com
Aww beautiful!
Xx
www.pretpenser.com
www.pretpenser.com
That's adorable! I might have to try this!
This is awesome, thanks for sharing. I love that monogram style. www.hotcelebration.com
What a great post! I think the large initial in the middle is supposed to be your last name though.
Thanks so much! And hmmm that makes sense, thanks for the tip!
Post a Comment